Robot Portrait lesson plan
Unit theme: Using Units in Art
Lesson: Robot Portrait using Units
Integrated subject: Mathematics
Level: 1st
Projected Time: 30-35minutes; including the 20-25 minutes for construction
Lesson: Robot Portrait using Units
Integrated subject: Mathematics
Level: 1st
Projected Time: 30-35minutes; including the 20-25 minutes for construction
Lesson Overview:
Along with learning about using units in measurement for mathematics, students will each create a 2-D Robot portrait out of units of construction paper. The students will design their robot to "preform a specific task." In addition, students will determine how many units it took to make up their robot. Students will be exposed to contemporary artists, who have used pixels and other means of units (such as Lego's, keyboard keys, etc) in their work.
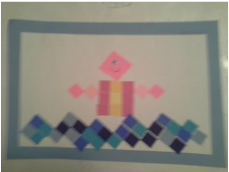
Image of Teacher exemplar:
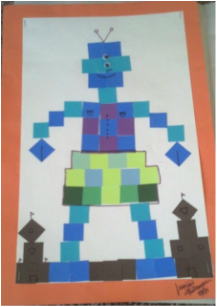
Created by Jessica Paternoster, October 28th, 2013
visual culture component:
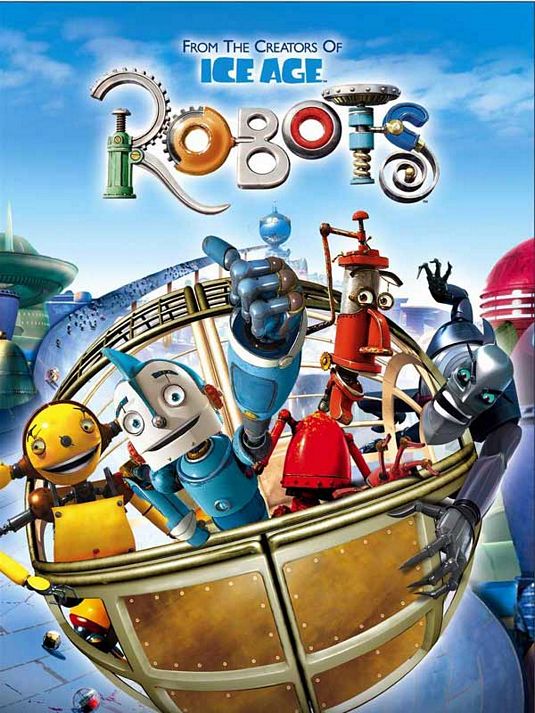
Elementary students see images of robots in their everyday life, particularly in animated movies such as WALL-E, produced in 2008 by Pixar Animation Studios and Robots, produces in 2005 by Blue Sky Studios . Most students would be able to identify numerous types of robots and some may want to represent their favorite characters in their work.

|
|
Vocabulary
- Construction Paper - a type of colored paper used for making designs, models, and other crafts
- Symmetry - the property of being the same or corresponding on both sides of a central dividing line
- Additive process - something added to something else to alter or improve it in some way, for example, to change the color or texture
- Shape – a 2 dimensional object
- Warm colors – colors that give the feeling of warmth; yellow, orange, red
- Cool colors - colors that give you a feeling of coolness; blue, green,
- Pixel – a very tiny area of illumination that makes a image on a display screen, or piece of art (square)
- Measure – to figure out the size, amount, or degree of something using a certain type of instrument
- Measurement – the action of measuring an item to figure out how big/short/long it is (usually given in units)
- Units – what you use to measure something by (e.g., blocks, inches, meters, marshmallows)
- Length – how long something is/how short something is (e.g., long(est), short(er), etc)
Standards:
Common Core State Standards Initiative, Approved 2012
Grade 1, Mathematics
Grade 1, Mathematics
|
Standard 1.MD.A.1.
|
Measure lengths indirectly and by iterating length units.
|
|
Indicator A.1
|
Order three objects by length; compare the lengths of two objects indirectly by using a third object
|
|
Indicator A.2
|
Express the length of an object as a whole number of length units, by laying multiple copies of a shorter object (the length unit) end to end; understand that the length measurement of an object is the number of same-size length units that span it with no gaps or overlaps. Limit to contexts where the object being measured is spanned by a whole number of length units with no gaps or overlaps.
|
South Carolina Visual Arts Standards, Approved 2010
Grade 1, Visual Arts
Grade 1, Visual Arts
|
Standard 1
|
The student will demonstrate competence in the use of ideas, materials, techniques, and processes in the creation of works of visual art.
|
|
Indicator VA1-1.1
|
Use his or her own ideas in the creation of works of visual art.
|
|
Indicator VA1-1.3
|
Use a variety of materials, techniques, and processes to create works of visual art.
|
|
Standard 2
|
The student will use composition and the elements and principles of design to communicate ideas.
|
|
Indicator VA1-2.3
|
Select and use various elements and principles of design to communicate his or her own ideas, feelings, and stories through works of visual art.
|
|
Indicator VA1-2.4
|
Discuss the elements and principles of design found in works of visual art.
|
|
Standard 3
|
The student will examine the content of works of visual art and use elements from them in creating his or her own works.
|
|
Indicator VA1-3.1
|
Recognize and describe the content in a work of visual art.
|
|
Standard 4
|
The student will understand the visual arts in relation to history and world cultures and the technologies, tools, and materials used by artists.
|
|
Indicator VA1-4.2
|
Discuss the works of visual art in relationship to the technologies, tools, and materials used by the artists
|
|
Standard 6
|
The students will make connections between the visual arts and other arts disciplines, other content areas, and the world.
|
|
Indicator VA1-6.1
|
Identify similarities and connections between the visual arts and other subjects in the school curriculum.
|
Objectives:
The learner will:
- Identify different units(pixels, paper squares, Lego's, inches)
- Express length of an object by using units (pre-cut construction squares)
- Identify and describe an element, pixels, which may be found in visual works of art and discuss thus materials
- Compare the length of one part of their robot to another part (using units)
- Express his/her ideas in the creation of their robot portrait
- Use a variety of materials to create their robot portrait
- Decipher between warm and cool colors
- Create robot portrait from a large piece of construction paper, pre-cut construction paper squares, and glue. Googly eyes and paint/colored markers will be used for details.
- Complete a worksheet and communicate a story through their robot portrait
- End up with a final product that has unique color and details that still resemble a robot.
procedure:
Prior to beginning the lesson(2 minutes):
Pass out material to each student:
Newsprint/newspaper,
Elmer's glue sticks,
16"x10" piece of white construction paper, and
safety scissors
Washable colored markers
Set up other materials in the front of the room:
Bowls of pre-cut 1"x1" construction paper - warm and cool colors
Googly eyes
18"x12" stack of assorted colored construction paper
Correlating worksheet
Set up PowerPoint
To begin the lesson, start by setting up expectations and activating prior knowledge (2 minutes):
New Information (10 minutes):
Construction (20-25 minutes):
Closing (2 minutes):
Pass out material to each student:
Newsprint/newspaper,
Elmer's glue sticks,
16"x10" piece of white construction paper, and
safety scissors
Washable colored markers
Set up other materials in the front of the room:
Bowls of pre-cut 1"x1" construction paper - warm and cool colors
Googly eyes
18"x12" stack of assorted colored construction paper
Correlating worksheet
Set up PowerPoint
To begin the lesson, start by setting up expectations and activating prior knowledge (2 minutes):
- "Before we begin, I wanted to remind you all that you must raise your hand before you speak, or wait for me to call on you. When someone else in the room is talking, make sure to listen and stay seated unless you ask. Leave the materials on the desk until I explain how to use them; and make sure that you are using them correctly. Also, if you have any questions or if I am going to quick, let me know. Now, who can tell me what we have been learning about in math class? (e.g., measurement, what units are, how to find length, that you can measure things with a ruler or blocks, etc)."
- Begin the PowerPoint and review the prior knowledge terms
New Information (10 minutes):
- Ask the students if they have ever seen art made out of units. Ask the students if they have ever played with Lego's or played a video game. Explain to the students that those are units that can be found in art.
- On the PowerPoint, introduce the artists that form the artist connection to this lesson.
- Teach new art vocabulary (pixel) in relation to art
- Ask students if where they have seen robots before.
- Show the students where they might have seen robots before (Pixar movies, etc).
- Explain to them that we will be creating robots portraits out of units, just like other artists have.
- Show teacher exemplar to the students and explain what they will do.
Construction (20-25 minutes):
- Each student will use the 16"x10" piece of construction paper as their background.
- Students will be given the option of what 1"x1" squares of either warm or cool colored construction paper they would like to use.
- Students will be instructed to design, by laying out, the shape of their Robot. They will be told that their robot either needs to have legs or arms, but not both if they choose not to.
- Once students lay out their robot, they will glue them down to the paper; they will be given more squares of colored construction paper as needed.
- Next, Students will raise their hand when they are ready for the eyes. At this point, the teacher will bring over the googly eyes and have the students choose which ones they would like to use. The students will glue the googly eyes on their robot.
- After, the students will use the washable colored markers to add details to their robot.
- Once they have finished their robot portrait, they will bring it to the front of the room and they will choose a warm or cool colored background (opposite of what their robot was) to matte their portrait on. Have the students sign their artwork on the bottom right side of the matting with on of the washable colored markers.
- Give the students the correlating worksheet. Instruct students to take their portraits back to their seat and fill out the worksheet that goes along with their project. When they have completed the worksheet, they will glue it to the back.
Closing (2 minutes):
- Students will clean up their work areas
- After clean-up, close out the activity by saying, "What did we do today? (e.g., that we can measure things and create things in different units). Yes, just like with math, certain artisit use units to create their artwork. What are some units that artists use? (e.g., pixels, Lego's, etc). What were the units that we used today to create our artwork? (e.g., paper squares). Awesome job! Now make sure that your work areas are clean and if you do not have time to finish your worksheet, you can finish it later." To finish, briefly tell the students what you will be working on in math class tomorrow.
- If time permits, allow the students to share/discuss their projects (how many units they used to create their robot and what they created their robot to do)
PowerPoint:
Correlating Worksheet:
Artists of Art History Focus:
Chuck Close: (1940-present) Disabled American painter & photographer, photorealist, best known for his massive scale portraits, dating from the late 1960's, using grid like bases forming ""pixels

Lucas, 1986 - 1987
|

Agnes, 1998
|
Nathan Sawaya: (1973) New York-based artist, best known for his work with standard LEGO bricks, large scale 3-D mosaics out of LEGOs, uses LEGOS as a form of pixels/"units" for his artwork


|


|
Guy Whitby: Australian artist, inspired by the digitization of celebrities, musicians, and politicians, well known for his pixelated portrait series using buttons he found on keyboards, calculators, and type writers

|

|
Computer generated pixel-ed robot

Evaluation:
- Your robot portrait is representative of your unique ideas of a robot
- Your robot portrait displays our version of pixels - units (pre-cut construction paper).
- You successfully created and added detail to your robot portrait using a combination of materials (construction paper, glue, googly eyes, markers), showing good craftsmanship (neatness).
- Your robot's body is made out of warm OR cool colors and the background you matte the picture on is the opposite (warm or cool).
- You are able to identify the units your robot is created out of (construction paper squares)
- You are able to identify how many units long your robots parts are (legs OR arms (head, height), and total units used) on the correlating worksheet.
Evaluation Rubric:
Materials and preparation (Class of 15):
- Large pieces of construction paper for robot portrait background (16x10)
- Stack of newspaper or newsprint
- Large pieces to put under artwork to keep table tops clean
- Elmer’s glue sticks (1 for each student)
- Safety scissors
- Construction paper in warm and cool colors (pre-cut into squares that are 1inch x 1inch); put into plastic bowls at each table
- Googly eyes (one pack of assorted eyes)
- Washable colored markers
- Correlating worksheet
- Construction paper for matting to frame robot portrait with once finished - in warm and cool colors (18x12)
- Optional: stapler (instead of gluing portrait to background)
Resources for Motivation:
- Common Core State Standard Initiative, Approved 2012, found at: http://www.corestandards.org/Math/Content/1/MD
- South Carolina Visual Art Academic Standards, Approved 2010, found at: http://ed.sc.gov/agency/se/Teacher-Effectiveness/Standards-and-Curriculum/documents/AcademicStandardsforVisualArts.pdf
- http://www.behance.net/gallery/Pixel-Robot/10297111 - Link to computer generated pix el-ed robot
- http://en.wikipedia.org/wiki/Nathan_Sawaya - Background information on Nathan Sawaya
- http://brickartist.com/ - Nathan Sawaya's webpage
- http://www.newyork.com/articles/jobs/master-builder-nathan-sawaya-and-his-2-5-million-lego-bricks-37045/ - Article on Nathan Sawaya
- http://fineartamerica.com/profiles/guy-whitby.html - Background information and art from Guy Whitby
- http://www.mymodernmet.com/profiles/blogs/workbyknight-wbk-guy-whitby-pixel-portraits - Guy Whitby information/profile
- http://en.wikipedia.org/wiki/Chuck_Close - Background information about Chuck Close
Reflection:
List three things that went well in my lesson and why those parts went well:
- The set up of the lesson went well. The set-up went well because I had all of the materials ready. I had all of the construction paper "units" already cut and separated into bowls for each table. By having the materials ready, I did not waste time in the beginning of the lesson trying to set-up.
- When the students began to create their robot, I suggested ideas and questioned them to get their brains motivated. This went well because the students were able to generate many unique ideas. There was not one robot that looked like another; nor did two robots have the same "job."
- The overall engagement of the students was well. All of the students were very active in creating their robot and sharing details about their robot. The students worked on creating their robot from the moment construction began, until it was time for the next presentation. This is a benefit because there was not any extra downtime that I had to fill. In addition, by the students being engaged, I was able to come to the conclusion that this was a good project.
- Next time, I could have a few construction paper "units" with magnets on the board to show the students how to put them together. This would have helped the students by eliminating some confusion of how to line up the "units."
- Another choice that I could do differently for next time would be going through the directions of how to build the robot step by step. I could have directed the students to do each part one-by-one, as a group, rather than giving the directions all at once. This would help students in remembering the steps in creating their robots.
- After presenting the lesson, I realized that it is important to wait until after the students have cleaned up to deliver the closing. Since I presented the cleanup and closing at the same time, I did not have the students' full attention.
Lesson Presentation:

|

|

|

|

|

|

|

|

|
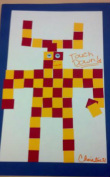
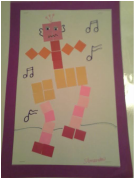
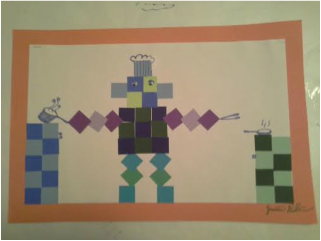
Student Examples:

|

|

|

|
|
|

|

|

|
|

|
|
